I have been keeping my dining room makeover TOP SECRET (unless of course you follow me on, oh say, instagram) in preparation for the VERY exciting launch of Merry Mag Summer!
My bestie Melissa of The Sweet Escape is the brains and beauty behind this gorgeous e-zine.

(I contributed to her first edition of Merry Mag last Christmas.)
Now that I have this whole huge amazing house to work with, I was happy to have a deadline to make me move my tush and get something done.
I have looooong coveted Hygge & West wallpaper.
So much so that I've started carrying them in the shop.
You're definitely going to start seeing a real wallpaper theme around the Green House.
One day, after I'm long dead and buried, some poor sap is going to buy our lovely house and say to himself "Holy hell, this woman loved her wallpaper. How the fuck am I going to get this shit off the ceiling!?"
(Yes. I wallpapered a ceiling, but I assure you, it's gorge.)
But back to my Merry Mag contribution.
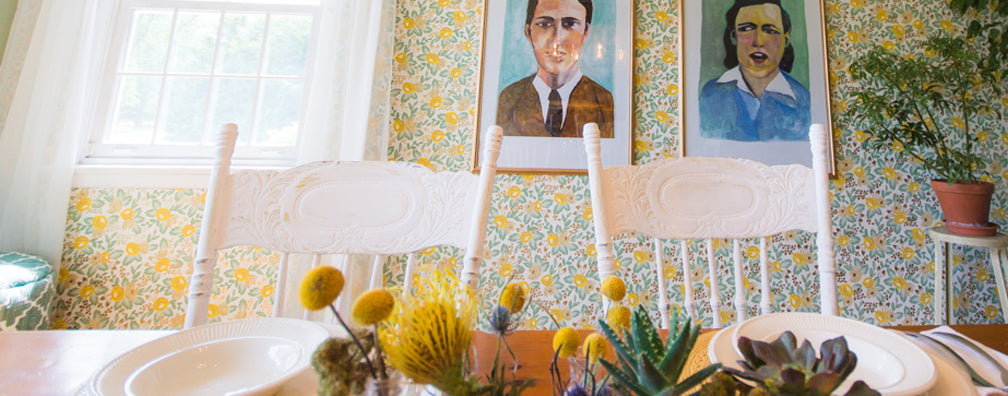
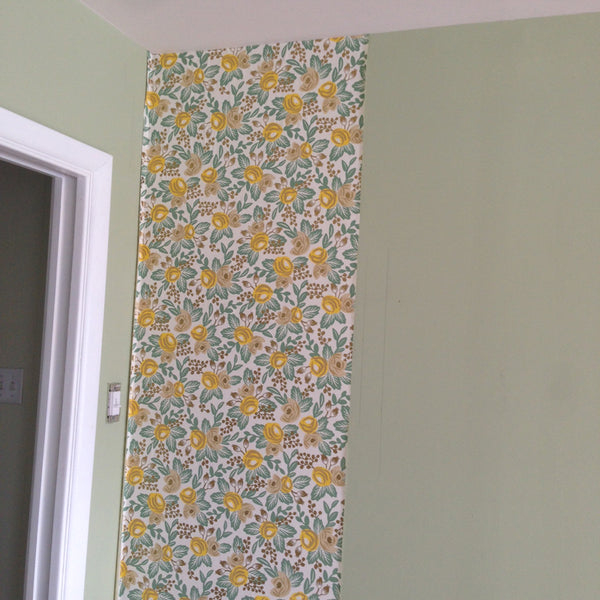
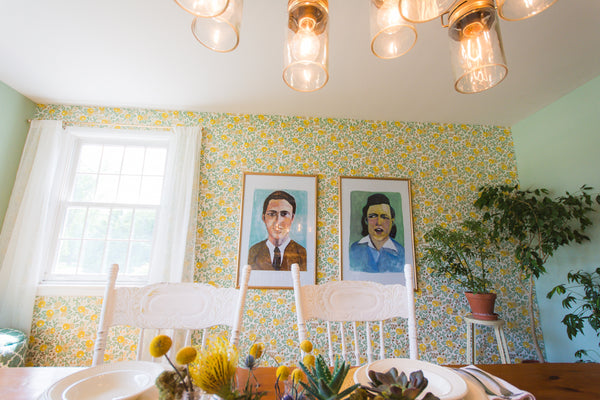
It all began with this wallpaper. Available here. 
If that's not a cheerful print, I don't know what is.
That gold detail? That's metallic yo. Shines bright like a diamond.
I want this room to be a little bit elegant, but also really warm and friendly.
I want an eclectic look that's a little mid century but still has layers and texture. I want a bright space that's both airy, and cozy. Can it be done? Oh yes. Yes it can.
Here's a couple shots of the room before its transformation.


The previous owners loooooved them some built ins.
So the first thing I did was get rid of the corner unit.
Because eww.
Reader's Note: When I say "I" it generally means "Brad" or "Dad". Unless it's something fun.

Honestly, wallpaper has been a lifesaver in this room.
My husband is no drywall whisperer. Sorry hun. Just sayin'.
I thought wallpapering was going to be a real challenge for an instant gratification girl like myself. But truly, the first strip was the only real painstaker.
This is an older house.
Lots of plaster, and the walls can not be trusted to be plumb. In the interest of not throwing my hard earned money out the window and wasting too much paper, I had to draw out a guide line.
(FYI Some of the best advice I received about hanging wallpaper can be read here).
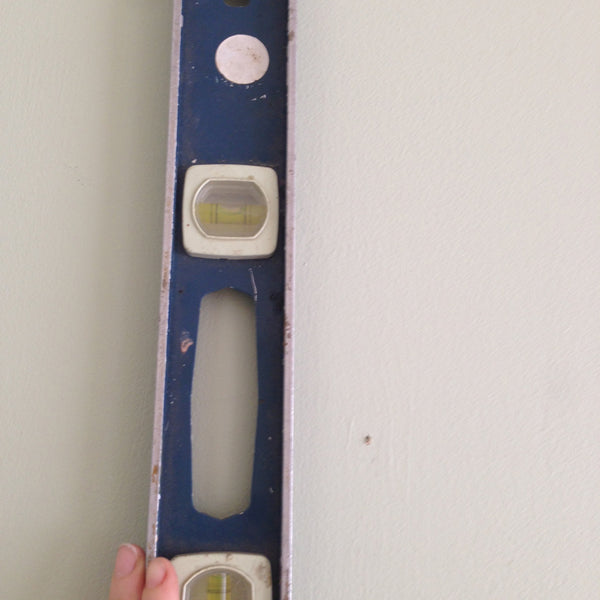
I lined the paper up with that first line, and just carried on from there.
Like a boss.

I was concerned that I'd kill myself trying to match the seams, but it really wasn't that hard.
I'm no perfectionist but I know a wonky match up would drive me to drink, so I did my best. By morning, you could hardly see the seams.
Perhaps the busier the design the better. Let's go with that. That's my tip for the day.
Next up was a trip to Value Village.
I was looking for a pendant I might be able to reclaim (read: hose down and spray gold) but instead I found myself in the picture frame aisle and landed myself two huge frames for $9.99 a pop.


Cha ching!
I promptly took them home, hosed them down, and sprayed those suckers gold.

And then came the problem of artwork.
How does one select just the right artwork for such a busy wall? I say go big or, you know, go home.
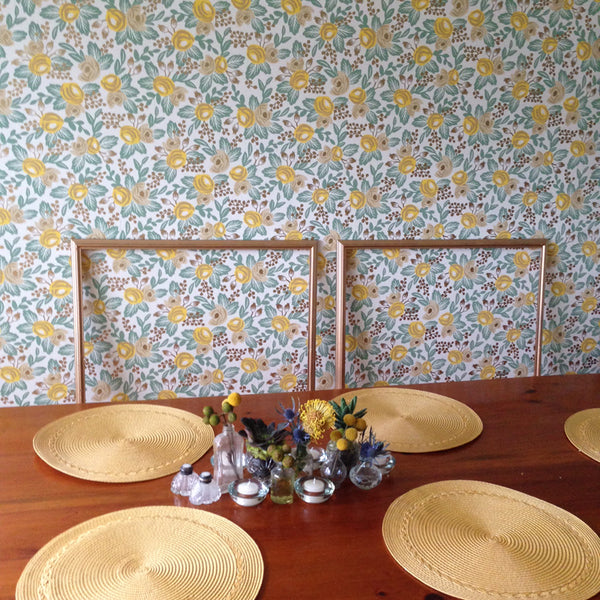
Since I was already home I decided to go big.
I discovered this incredible artist after she applied to be part of Handmade Harvest.
I had been envisioning portraits, but couldn't see myself using photographs, or anything too dark and historical.
Mr & Mrs Turturici however?

Well they're just perfect.
Isabella was kind enough to allow me to make enlargements of her prints (which I purchased from her Etsy shop) so that they'd fit my big frames. I took them to our local sign & print shop where they were scanned and reprinted.
Side note: If you're in the Ottawa area and need a print job, Almonte Sign Co is THE place. They also do all my Campy candle labels, window signage at the shop, and pretty much anything I can dream up. And you know I like to dream.
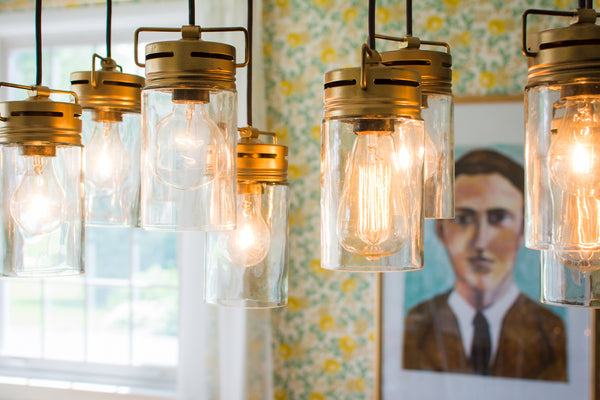
The pendant light I chose was just as important as the artwork.
I want to love everything about this room, so I had to go on a hunt for the perfect fixture.
While trolling the aisles at Lowes, I stumbled upon this one.

I feared it might be a little chunky for the space, but there was something about it I really loved.
And, because I know how a little gold spray paint can transform an object, I promptly put it in my cart.
With help, I'll add.
I bought the display light.
Because what? I'm supposed to wait for them to order one in? Na na na na na. I mentioned the instant gratification thing right?
Brad was away for the weekend so I called good old dad to come on over and help me figure out how to install it.
I believe his words were "This is a f*cking nightmare Em. I mean we'll do it, but this is going to be a nightmare." Eventually we called an electrician. I still think I could have figured it out. I mean, what's 8 sets of wires right?
Chump change.

Spray painting however, I can do.

And ouala!
So pretty!

For the chairs, I decided to try my hand at chalk paint. Tin Barn Market here in Almonte carries Annie Sloan chalk paint, and I've always wanted to try it out.
We have 6 press back dining room chairs that I purchased for a steal at another local shop called Almonte Antique Market.
I spent more than double what I paid having them tightened up and repaired, but they're investment chairs Brad.
Investment chairs.
Because part of the fun with chalk paint is that you sand it off ever so slightly to reveal what's underneath, I decided to grab my little helper (OMG perfect job for a kid), strip him down and put him to task.
Can we talk about this bum?
That's my bum. You can't have it.

After the chairs (and the grass and a little bit of my shoes) were good and yellow, it was time for the chalk paint.
Each chair got two coats because I wanted overall coverage and not too much of the shabby chic look you usually get from chalk paint.


After the paint dried, I gave the chairs a light sand to reveal the paint beneath, and then coated them lightly with clear wax.
Honestly, I wasn't sure how I felt about the chalk paint situation. After I waxed them, they felt a little too, well, waxy.

I called Tin Barn in a huff and they explained that I have an attention deficiency and that indeed the wax does need to be wiped off like they told me.
So that helped.
Once the bigger jobs were prepped and/or completed, it was time for my faaaaavourite part.
Staging.
I had a great plate wall at the old place, and although the colours didn't all work in this new room, I was able to use some of the white ones. I just love a good plate wall.
Also included in the mix is one of The Sweet Escape's gold leaf pineapple plates (You should buy THIS one) so, bonus points for me I think huh?
The original curtain panels were a little to "shear-like" for me so I replaced them with these simple "linen-like" ones.
I got them at Fabricland on a steep discount ($19.99 for two full panels), chopped them up and resewed them.


After the sewing was done, I quickly added an ugly old brown baseboard heater because I was afraid the room was getting too pretty. Still not sure that was the right choice...

Then I stepped back from the window and realized I'd done a terrible terrible job, not only were they wonky but they were too short and screamed "I'm a DIY project! Look at the thread my maker chose! It's not even a perfect match!", so I threw them in the donation bin and went to Home Sense where I found perfect, nearly identical if not better replacements.
I found this little geometric gem at Urban Barn a few months ago and immediately re-imagined it in pink.

I mean gold.
Psych! Hahahaahahaaaa!! (Oooo I'm tired)

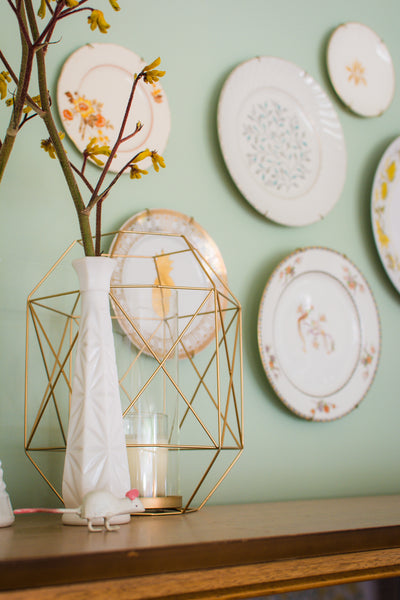
Dried flowers were selected at Acanthus Floral (Almonte) and placed into a variety of glass vases that I picked up for ONE DOLLAR at Value Village to make the perfect little wilt-free centerpiece.
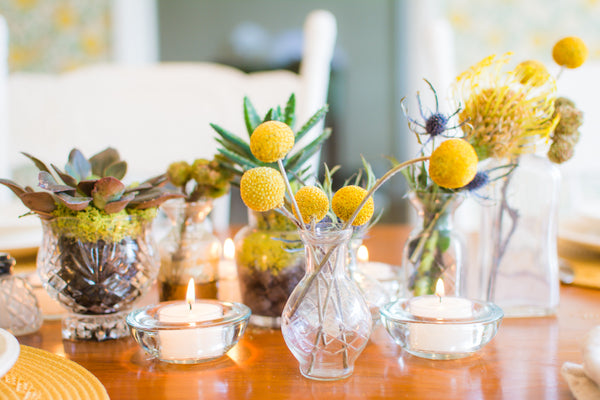
I incorporated a few succulents just to keep things interesting.

Must remember to water those...
Finally, I went back to Hello Yellow and Tin Barn Market and stole a bunch of things right off our sales floors to jazz the space up.

Without further adieu...my "cheerfully made" dining room makeover.
Let's see the "before" again shall we?
Booooooring...
And AFTER!

OMG so cheerful right!?
I love love love this room.


My super pregnant, hilarious, talented friend Sarah Evans of Shoebox Pics was kind enough to take the beautiful pictures you see in this post. Thank you Sarah. I hope the baby appreciates you as much as I do.
She won't, by the way.
xo Em